Model Description
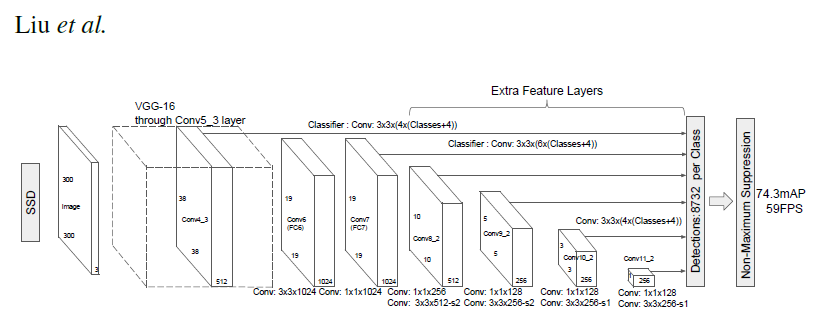
SSD300 모델은 “단일 심층 신경망을 사용하여 이미지에서 물체를 감지하는 방법”을 설명하는 SSD: Single Shot MultiBox Detector 논문을 기반으로 합니다. 입력 크기는 300x300으로 고정되어 있습니다.
이 모델과 논문에 설명된 모델의 큰 차이점은 백본(backbone)에 있습니다. 특히, 논문에서 사용한 VGG 모델은 더 이상 사용되지 않으며 ResNet-50 모델로 대체되었습니다.
Speed/accuracy trade-offs for modern convolutional object detectors 논문에서, 백본에 대해 다음과 같은 개선이 이루어졌습니다.
- conv5_x, avgpool, fc 및 softmax 레이어는 기존의 분류 모델에서 제거되었습니다.
- conv4_x의 모든 strides는 1x1로 설정됩니다.
백본 뒤에는 5개의 합성곱 레이어가 추가됩니다. 또한 합성곱 레이어 외에도 6개의 detection heads를 추가했습니다. The backbone is followed by 5 additional convolutional layers. In addition to the convolutional layers, we attached 6 detection heads:
- 첫 번째 detection head는 마지막 conv4_x 레이어에 연결됩니다.
- 나머지 5개의 detection head는 추가되는 5개의 합성곱 레이어에 부착됩니다.
Detector heads는 논문에서 언급된 것과 유사하지만, 각각의 합성곱 레이어 뒤에 BatchNorm 레이어를 추가함으로써 성능이 향상됩니다.
Example
아래 예에서는 사전에 학습된 SSD 모델을 사용하여 샘플 이미지에서 객체를 탐지하고 결과를 시각화합니다.
예제를 실행하려면 몇 가지 추가적인 파이썬 패키지가 설치되어 있어야 합니다. 이는 이미지 전처리 및 시각화에 필요합니다.
pip install numpy scipy scikit-image matplotlib
COCO 데이터셋에 대해 사전에 학습된 SSD 모델과, 모델의 입력 및 출력에 대한 편리하고 포괄적인 형식 지정을 위한 유틸리티를 불러옵니다.
import torch
ssd_model = torch.hub.load('NVIDIA/DeepLearningExamples:torchhub', 'nvidia_ssd')
utils = torch.hub.load('NVIDIA/DeepLearningExamples:torchhub', 'nvidia_ssd_processing_utils')
추론을 위해 불러온 모델을 준비합니다.
ssd_model.to('cuda')
ssd_model.eval()
객체 탐지를 위한 입력 이미지를 준비합니다. (아래 예제 링크는 COCO 데이터셋의 처음 몇 개의 테스트 이미지에 해당하지만, 로컬 이미지에 대한 경로를 지정할 수도 있습니다.)
uris = [
    'http://images.cocodataset.org/val2017/000000397133.jpg',
    'http://images.cocodataset.org/val2017/000000037777.jpg',
    'http://images.cocodataset.org/val2017/000000252219.jpg'
]
네트워크 입력에 맞게 이미지를 포맷하고 텐서로 변환합니다.
inputs = [utils.prepare_input(uri) for uri in uris]
tensor = utils.prepare_tensor(inputs)
객체를 탐지하기 위해 SSD 네트워크를 실행합니다.
with torch.no_grad():
    detections_batch = ssd_model(tensor)
SSD 네트워크의 기본 출력값은 객체의 위치를 식별하는 8732개의 box와 클래스 확률 분포를 담고 있습니다. 보다 의미있는 결과(신뢰도>40%)만 필터링 해 보겠습니다.
results_per_input = utils.decode_results(detections_batch)
best_results_per_input = [utils.pick_best(results, 0.40) for results in results_per_input]
이 모델은 COCO 데이터셋에 대해 학습되었고, 클래스 ID를 (사람이 식별할 수 있는) 객체 이름으로 바꾸기 위해 coco 데이터셋에 접근이 필요합니다. 처음에 다운로드할 때는 시간이 걸릴 수 있습니다.
classes_to_labels = utils.get_coco_object_dictionary()
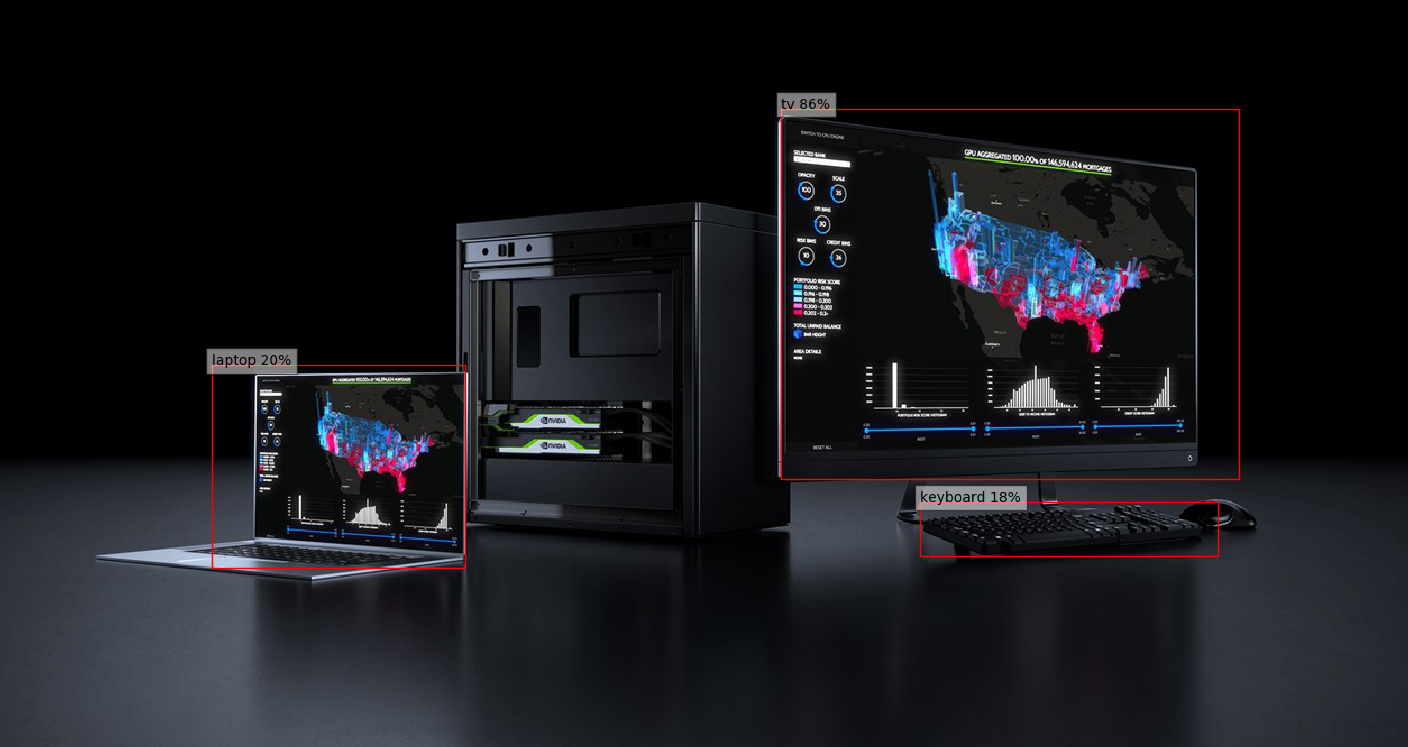
끝으로, 탐지한 결과를 시각화해 보겠습니다.
from matplotlib import pyplot as plt
import matplotlib.patches as patches

for image_idx in range(len(best_results_per_input)):
    fig, ax = plt.subplots(1)
    # Show original, denormalized image...
    image = inputs[image_idx] / 2 + 0.5
    ax.imshow(image)
    # ...with detections
    bboxes, classes, confidences = best_results_per_input[image_idx]
    for idx in range(len(bboxes)):
        left, bot, right, top = bboxes[idx]
        x, y, w, h = [val * 300 for val in [left, bot, right - left, top - bot]]
        rect = patches.Rectangle((x, y), w, h, linewidth=1, edgecolor='r', facecolor='none')
        ax.add_patch(rect)
        ax.text(x, y, "{} {:.0f}%".format(classes_to_labels[classes[idx] - 1], confidences[idx]*100), bbox=dict(facecolor='white', alpha=0.5))
plt.show()
Details
모델 입력 및 출력, 학습 방법, 추론 및 성능 등에 대한 더 자세한 정보는 github 및 NGC에서 볼 수 있습니다.
References
- SSD: Single Shot MultiBox Detector paper
- Speed/accuracy trade-offs for modern convolutional object detectors paper
- SSD on NGC
- SSD on github